on orders $100 and over*
*See Shipping Policy for Exceptions
Specs & Features
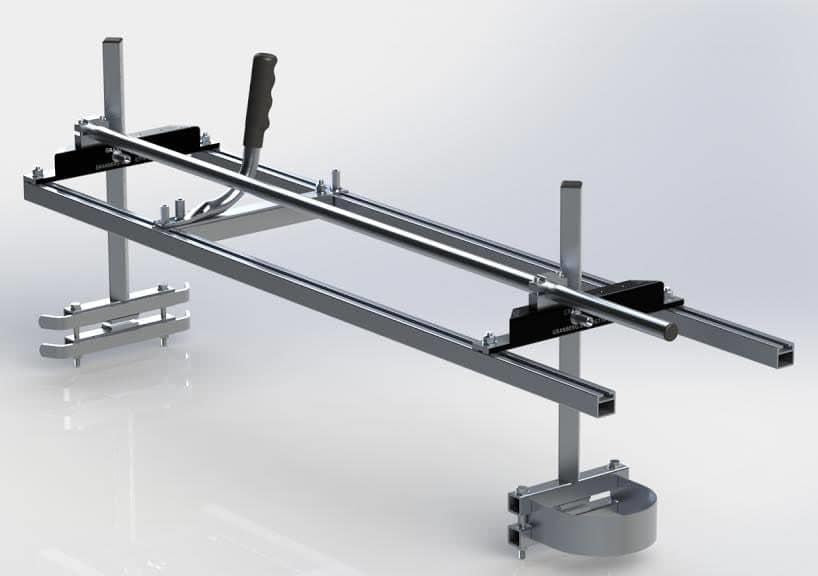
Granberg's versatile, heavy-duty chainsaw lumber mill precisely cuts planks and beams up to 44" wide and 1/2" - 13" deep. This mill is perfect for woodworkers, arborists, sawyers and homeoweners. For use with chainsaws with bars of 48" or less, OR double-ended bars of 56" or less and 90cc or more diplacement.
Learn from Mr. Erik Granberg, President of Granberg International the tips and tricks to getting the best results from your Alaskan Chainsaw Mill. View all of our Saw Mills Here.
VIDEO RECAP
1. THREE important things to consider before milling. One, does your chainsaw have enough power? (see chainsaw size and power reference chart below). Two, ripping chain is necessary! Three, a first cut system to assist in your first cut. (0:35)
2. Inspect log and debark. Check diameter of log vs the cutting width of mill. Is your mill going to make it through the cut? There may be a section that is too wide. This can be trimmed before milling. (2:00)
3. Mount Alaskan Mill onto bar. Adjust to fit bar. Avoid clamping down on the sprocket nose. Tighten all hardware. The clamping bolts for the bar and end bracket require 10-12 pounds of torque. Tighten evenly. All other carriage bolts use 8-10 pounds of tightening torque. Do not over tighten, this only weakens the bolts. (3:15)
4. Tool kit check. (11:07)
5. Safety Equipment. Chaps, gloves, boots, eye and ear protection are required! (11:51)
6. Make sure your wedges are handy! (12:20)
7. Best way to start your second cut. (13:17)
8. Wedging tips while milling. (14:18)
9. What to look, listen and feel for while milling. (14:54)
10. How to exit the cut. To keep the mill from dipping when exiting cut, put a little back pressure on upright handle and support the powerhead. (17:24)
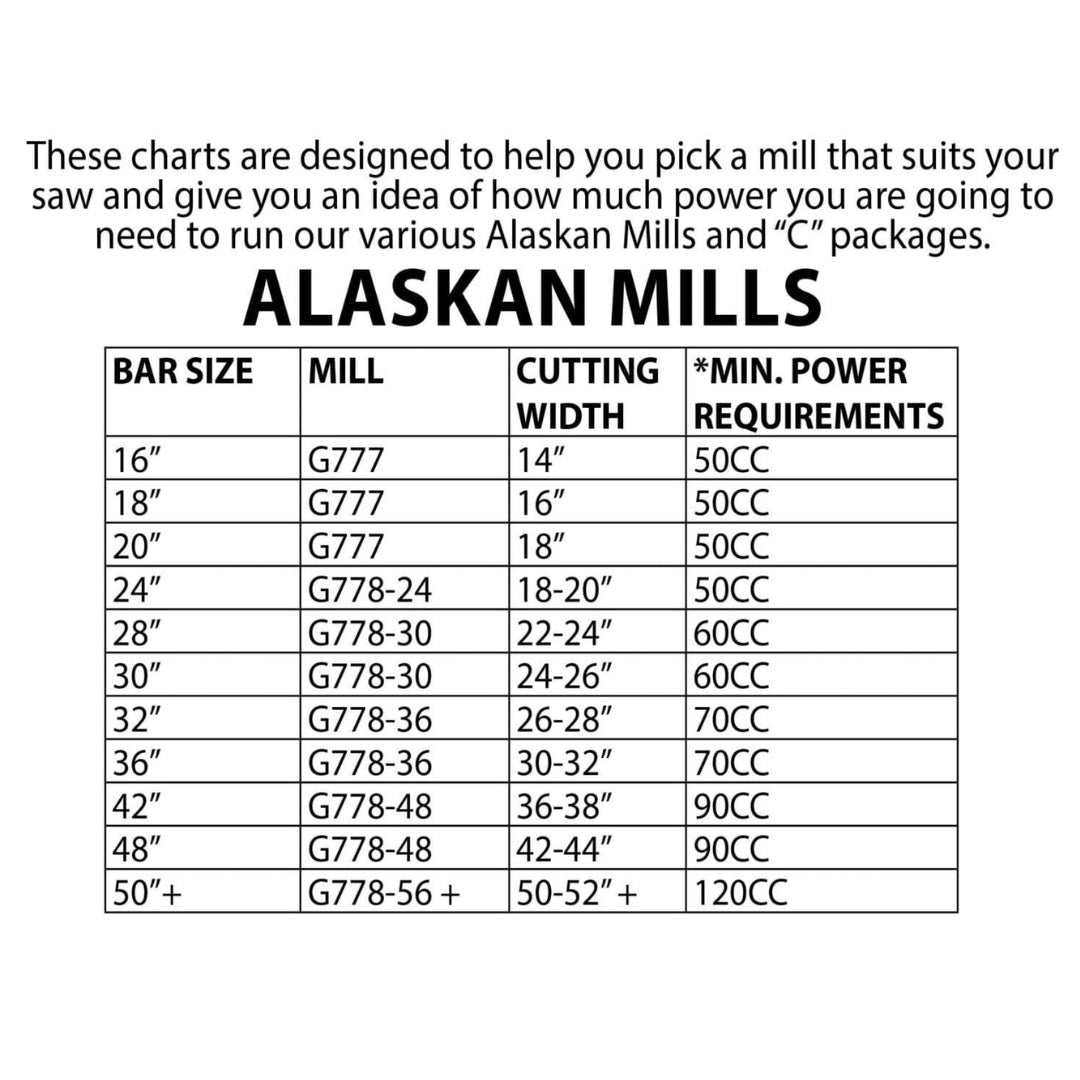
In general, you will need at least 50cc to run our smallest mill (G777). The more powerful your saw, the easier your milling experience is going to be. Consult the chart to see if your chainsaw has enough power to do the job you want it to do. Under-powered saws will take longer to make a cut and may overheat and possibly fail. You will definitely want to use a ripping chain and take your time. Granberg will not take responsibility for damage caused by using saws that are under-powered. We also recommend against using battery or electric saws.
A ripping chain is a semi chisel option that’s used on shallow-angle cutters with around 10° cutting angle. It cuts along the wood grain rather than cutting across the pores or veins, which is different from other options available in the market. This speciality chain is used for milling, meaning it can only be used for specific projects where smoother wood surfaces are required. Here are some of the advantages of this particular type of chain:
Please view our Oregon Ripping Chain Here.
Please view our Granberg Ripping Chain Here.
Just like any other saw chain, compatible Ripping Chain is found by using Pitch, Gauge, and Drive Link Count.
The easiest way for you to determine your chain information is to look at the bar. Nine times out of ten, the bar will have the information you need, usually in the area indicated below.
If the bar has been used to the point where the information there is unreadable (or if it was never there to begin with), it’s not the end of the world. Inspect your drive link (indicated by the B in the diagram below). It should be marked with one of the IDs in the table below.
If you have a chain manufactured by Stihl, there will be two identifying marks - one on the drive link and one on the raker/depth gauge on the leading edge of the cutter (indicated by A in the diagram). For all other chains, you will only need to check the drive link for the information you need.
Once you find the drive link ID, you can figure out the Pitch and Gauge - then all that remains to be done is to count the drive links.
Please view our Oregon Ripping Chain Here.
Please view our Granberg Ripping Chain Here.
It's important to have proper wedges. Depending on the size of the log you are milling, the weight of the slab or beam may be pinching the chain. Using wedges as you move through the cut can help lift the wood out of the way. Wedge early, wedge often. You can buy some on our website here if you don't have any at home.
A good wedge is at least 6″ long, 3″ wide and tapered from 3/4″ to 0″. Best to put at least 5 in your back pocket or tool pouch. After you cut into the log, about 2 feet, put the first wedge into the beginning of your cut. Then put a wedge in every two feet.
Larger, thicker slabs require more support, meaning use more wedges and tapping them in really well.
Lighter, smaller slabs require less support, meaning use less wedges and giving just a quick tap.
Yes, all of our MKIII Alaskan mills can be adapted to fit a smaller bar, because the thickness rails have a channel all the way down that will allow the depth post to be moved. So, if you have a 32” bar, you will want a 36” mill (G778-36). The nose end depth post can be adjusted down to fit the smaller bar.
Likewise, if you have a 36” bar at the moment, but are maybe thinking about investing in a larger bar, you can buy a 48” mill (G778-48) and put it on the smaller bar until you get the upgrade.
One consideration you will have to make is although you can put a larger mill on a smaller bar, the mill size itself will not change, so you will need enough room to operate a 48” mill even if you are only using a 36” bar. This is really only an issue in the thickest of brush. If you’re milling in your driveway or front yard, you shouldn’t have a problem.
on orders over $100
when provided with model info
outside Washington and Wisconsin